Sunday, 28 October 2012

Zombielicious

“Darkness falls across the land
The midnight hour is close at hand
Creatures crawl in search of blood
To terrorize your neighbourhood”

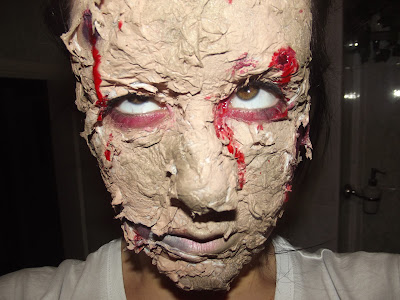
CAUSE THIS IS THRILLERRRRRRR… er kinda! This year, the search for the most awesome Halloween costume has led me to explore new regions of madness. So on a humble Friday night, I decided to dress up as a zombie! (Pretty standard Friday night for me really!)
Although the outcome is pretty unique, I won’t be dressing as this for Halloween – mainly because I dislike the fact the blood didn’t dry on my face, and it was left tacky and sticky. But it was definitely fun to do! Also, unlike the MJ ‘Thriller’ zombies, me dressed as a zombie still means I CANNOT DANCE. However, I thought this little exploit of makeup artistry was worthy enough to compensate for the fact I have two left feet!

So what did I do?
Much like my ‘burnt face’ post, which you can find here, I started by ripping up pieces of toilet roll. After generously moisturising my face, I plastered it in eyelure eyelash glue and randomly stuck the pieces on. Once dried, I took my tweezers and pulled at sections of the paper to expose my bare skin. These were going to be the holes for my wounds.
Applying the foundation mix with a paintbrush - so as not to ruin one of my treasured
makeup brushes!
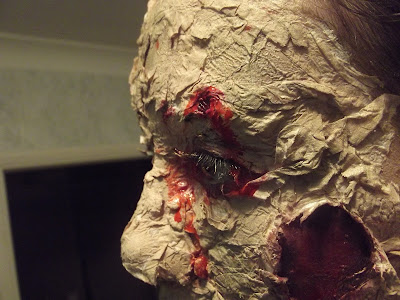
I then mixed a Natural Collection foundation, which was a cheapo £1.99 one from Boots, with a green eye shadow to create a skin-but-slightly-dead colour. I then used a paintbrush to apply this generously over my face, covering as much of the white paper as possible, but leaving the areas around my eyes and in the wound holes bare, ready for the red. I then dusted more grey and green shadows to contour and add dimension to my face.
What beautiful eyes you have!?
A little close-up on the wound - just what you wanted!


After this, I took a bright red lipstick and a small lip brush and filled the bare skin holes up with the colour, much like my ‘burnt face’ post I continued to dust various black, red and purple shadows over the area, followed by a deep red lipgloss to make it look fresh. By putting black around the edges of the wound made it look extra deep! I took these same steps for the underneath of my eyes, just to make sure I looked extra insane.
When the desired look had been created, including the face colouring and wounds, I finished off by squeezing some fake blood over the wounds - mwhahahahaha!
"Uuuughhchhhhh" Said Zombie Zoë! 
The final outcome looks pretty mad. Not really seen anything like this before, but that’s me I guess! For an outfit I imagine I’d wear torn up clothes, possibly blood-stained, and I would continue what I had done down the neck and across the ears too, which for this I left bare.
"It's close to midnight, and something evil's lurking in the dark"
As for inspiration, I’d just finished watching Juan Carlos Fresnadillo’s '28 Weeks Later’ (which is one of my favourite films!) and wanted to be a zombie too, so I’m guessing that’s where it came from!
I also had a nosey on google for some more traditional zombie images, then went totally against them and created my own look! If you’re intending to recreate this just have a load of fun with it and remember, it’s only makeup!

I hope you enjoyed looking/reading – and have a happy Halloween!
Lots of love from Zoë ♥ xxxxxxxxxxxx

P.S. What are you dressing up as for Halloween - comment below!? I'm still undecided! :)

Monday, 24 September 2012

Pass the loo roll.


This is a purely prosthetic-inspired look, in which I aimed to make my face look like it had been burnt?! Creepy eh – and just in time for HALLOWEEN! And the secret, expensive, rare material I used for this look? Loo roll. Just your bog standard (hehe) paper you’d wipe your bits with?!


I started by moisturising my face, just so I had something tacky to place the paper on before adhering it. I then smothered the area in eyelash glue and took think layers of the paper and ripped them and tore them into malleable pieces before sticking them to my face. I then took a finger-full of Vaseline and rubbed it around the edges to smooth it onto my bare skin. Afterwards, I took a deep red blush and smoky black eye shadow (just cheapo ones, nothing expensive!) and began to pat it on top of the paper/Vaseline combo. NOTE: THIS IS WHERE IT GETS MESSY! I then took a mega cheap sticky red lip gloss and used a cotton bud to move it around the area mixing it with the red and black shadow combo. When I had achieved the desired colour/look, I took a pair of tweezers and pulled at the tissue and filled in any white bits with more shadow, and used a little high-coverage liquid concealer around the edges where necessary.


 As for the rest of my face, I took a powder puff with a little of the black shadow on and patted it around my face, aiming to give it a bit of a ‘smoke-damaged’ look, I didn’t even use any foundation. I continued this down my neck and onto my ears (as I had my hair pulled back into a tight ponytail) and onto the eyelids. No other makeup, including touching my brows or mascara was used, as the primary focus of this was the true-to-life looking burnt section.


Even though I used literally 20 cotton buds, and had to have a major deep cleanse of my face, including exfoliation as well as an intense regenerating face mask, this is by far one of my favourite looks I’ve ever created! 


Please comment below if you’d like to see a mini tutorial of how I did this on my YouTube channel, I’d love to do one anyways!

Thanks for your time! Do come and find me on YouTube if you wish: www.youtube.com/user/ZElizabethBeauty
And come say 'Hey!' on twitter: www.twitter.com/TheGhostOfZoe

Lots and lots of love from Zoë xxxxxx

p.s. HAPPY HALLOWEEN!!! ♥


Monday, 30 July 2012

I'm A Glitter Fairy!

Picture taken by me. 

Property of moi.

Encompassed amidst a sea of emerald, perfect pink, chunky gold, bronze and mainstream silver glitters I ventured deep into the imaginative section of my brain to toy with these materials. When given time, materials and glue I can sit for hours going wild with new ideas surrounding makeup. I seem to feel at ease with the world when I can go completely mad even if the final outcome is somewhat ghastly.

Beginning with a pastel blue colour I simply washed it (mixed with a tad of water) across the platform of my eyelid, bringing it up higher than usual yet lower than my brow. On the inner third of the upper lid I introduced a pastel pink shadow, which was then reflected underneath my lower lashes. After applying a generous (and I mean a generous) coat of black mascara on upper and lower lashes I placed some eyelash glue on top of the pink shadow under my lashes. On this I spread some reflective pink glitter, sparkaliscious.


Along the top lash line I used a larger-piece green glitter as I thought it complimented the blue colour and in the inner corner I used a coppery bronze which complimented both the blue and the pink well. To finish I added a small-piece silver glitter on the brow bone and a large flex gold above the bronze.

Just to go even more over the top I pasted some eyelash glue on top of my actual lashes and applied a holographic glitter. This tied in this overall odd glitter mix, and well I really like the overall outcome.


I’m sure I’ll have many other mad creations to come, so if you enjoyed these visuals do follow me here on ZElizabethBeauty!

Many thanks again, Zoë xxxx

www.twitter.com/TheGhostOfZoe
www.youtube.com/ZElizabethBeauty
www.pinterest.com/TheGhostOfZoe


Saturday, 14 April 2012

Parma, Parma, Parma, Parma chameleon? No… bad joke?

Firstly, and ridiculously, my local Topshop does not hold a makeup section – which is genuinely barbaric. So I’ve never really been interested in their makeup. But recently I’ve been having a nosey around their online store and have come across their ‘nails’ range. I fell in love with quite a few of the colours; especially for SS2012, but felt a bit silly ordering one or two of the little pots and paying £3 for them to be delivered, so when I visited Topshop Oxford Street – I felt the need to purchase one, being fantastically priced at only £5!

One colour in particular really caught my eye, and it happened to be ‘Parma Violet’, a perfect lilac colour the twin of famous sweets Parma Violets (nice one there for noticing Zoë…). I HATE the sweets, they hurt to eat, but this colour is just simply b-e-a-utiful, honestly. I feel in some lights it looks blueish and in others slightly fuchsia, but you can’t deny how much of a lilacy lilac this colour really is. Pastels are well and truly in at the moment, and even though I’m not too much of a stickler for up-to-date fashions, even I do love this trend.  As for coverage, after a base coat I applied one thin layer of the nail varnish and left it to dry. With one coat it does look slightly ropey, but after following Topshop’s instructions (on their website) and applying a second coat the beautifulness of this product really does show through. Finish with a shiny top coat and you have pretty little nails to be proud of. 
 Topshop Nails in 105 Parma Violet

Topshop, you've made me a happy Zoë and I’ll happily purchase more of the amazing range of colours again soon! A definite recommendation from me